Last Updated on August 2, 2024 by E. Scott
Creating an Angular data table can be daunting if you’re not sure where to begin. Check out the code below to get you up and running quick. As most everything these days is powered by endpoints, this Angular data table uses JSON mock data to emulate a response. Please see the below JSON. If however you’re looking for a JavaScript version, this may be comparable.
This Angular data table uses a package for the pagination. If you’re looking for pagination code, as in something you can modify, let me know in the comments. This project (shown below) however has custom written pagination. If you’d like to brush up on TypeScript, here’s another quick project. This TypeScript slider is an alternative.

Table of Contents
Data and Interface
[
    { "year": "1967", "make": "Pontiac", "model": "GTO" },
    { "year": "1967", "make": "Pontiac", "model": "Firebird" },
    { "year": "1967", "make": "Chevrolet", "model": "Malibu SS 396" },
    { "year": "1967", "make": "Chevrolet", "model": "Camaro SS" },
    { "year": "1967", "make": "Chevrolet", "model": "Camaro Z/28" },
    { "year": "1967", "make": "Chevrolet", "model": "RS" },
    { "year": "1967", "make": "Chevrolet", "model": "Nova SS" },
    { "year": "1967", "make": "Oldsmobile", "model": "442" },
    { "year": "1967", "make": "Buick", "model": "Gran Sport" },
    { "year": "1967", "make": "Ford", "model": "Mustang GT" },
    { "year": "1967", "make": "Ford", "model": "Mustang GTA" },
    { "year": "1967", "make": "Ford", "model": "Fairlane GTA" },
    { "year": "1967", "make": "Shelby", "model": "Cobra" },
    { "year": "1967", "make": "Shelby", "model": "Mustang GT350" },
    { "year": "1967", "make": "Shelby", "model": "GT500" },
    { "year": "1967", "make": "Mercury", "model": "Cougar Special" },
    { "year": "1967", "make": "Mercury", "model": "Cyclone GT" },
    { "year": "1967", "make": "Mercury", "model": "427 Comet" },
    { "year": "1967", "make": "Plymouth", "model": "Barracuda Formula S" },
    { "year": "1967", "make": "Plymouth GTX", "model": "GTO" },
    { "year": "1967", "make": "Dodge", "model": "Dart GT" },
    { "year": "1967", "make": "Dodge Dart GTS", "model": "GTO" },
    { "year": "1967", "make": "Dodge", "model": "Charger" },
    { "year": "1967", "make": "Dodge", "model": "Coronet R/T" },
    { "year": "1967", "make": "Dodge", "model": "Coronet 500 Hemi" }
  ]
The above JSON is JavaScript Object Notion. Succinctly, it’s structured data. Also known as the payload. We may request the entire payload or just the first ten. Using pagination allows us to reduce the size of the payload. In turn, increase speed and performance of our app.
By using this practice in page content and other assets, we’re reducing unnecessary bandwidth. Important for those using mobile devices in places where there may be a poor connection.
Yes, of course we could certainly retrieve the payload a variety of ways. But to add some security to thereof, we create something called an interface. Interfaces are blueprints of the data. This is so our application knows exactly what to expect. Otherwise, bad actors who may try to penetrate our creation could potentially send us a payload with unwanted data. Our interface is exported so it’s accessible by other parts of our app.
export interface CarsResponse {
    year: string;
    make: string;
    model: string;
}
This interface in an object blueprint. Used to express the necessary keys. Enforced at runtime, not upon transpilation.
As for the pagination, we’re not creating it from scratch. We’re using a package. This is a collection of pre written code. Packaged and ready for anyone to import. Run this command in your CLI. There’s undoubtedly other packages we could use for our Angular data table, but this a good one.
npm i ngx-paginationOr, head over to ngx pagination , read about the package, then run the necessary CLI command. Since you’re reading this, I gather you have the need for pagination, and therefore already well into developing an app. So, I’ll assume you know how to work with packages in your environment.
import { NgxPaginationModule } from 'ngx-paginationThough this is written in Angular, it’s very similar to native TypeScript. If you’re looking for a data table written entirely in TypeScript, let me know in the comments and I’ll create one.
Angular Data Table TypeScript
For recent versions of Angular, this may look slightly different. Perhaps that’s expected as it’s quite difficult to stay current on frameworks and update project code. Regardless, here’s the steps:
- Create an array for the incoming data.
- Apply the CarsResponse data type.
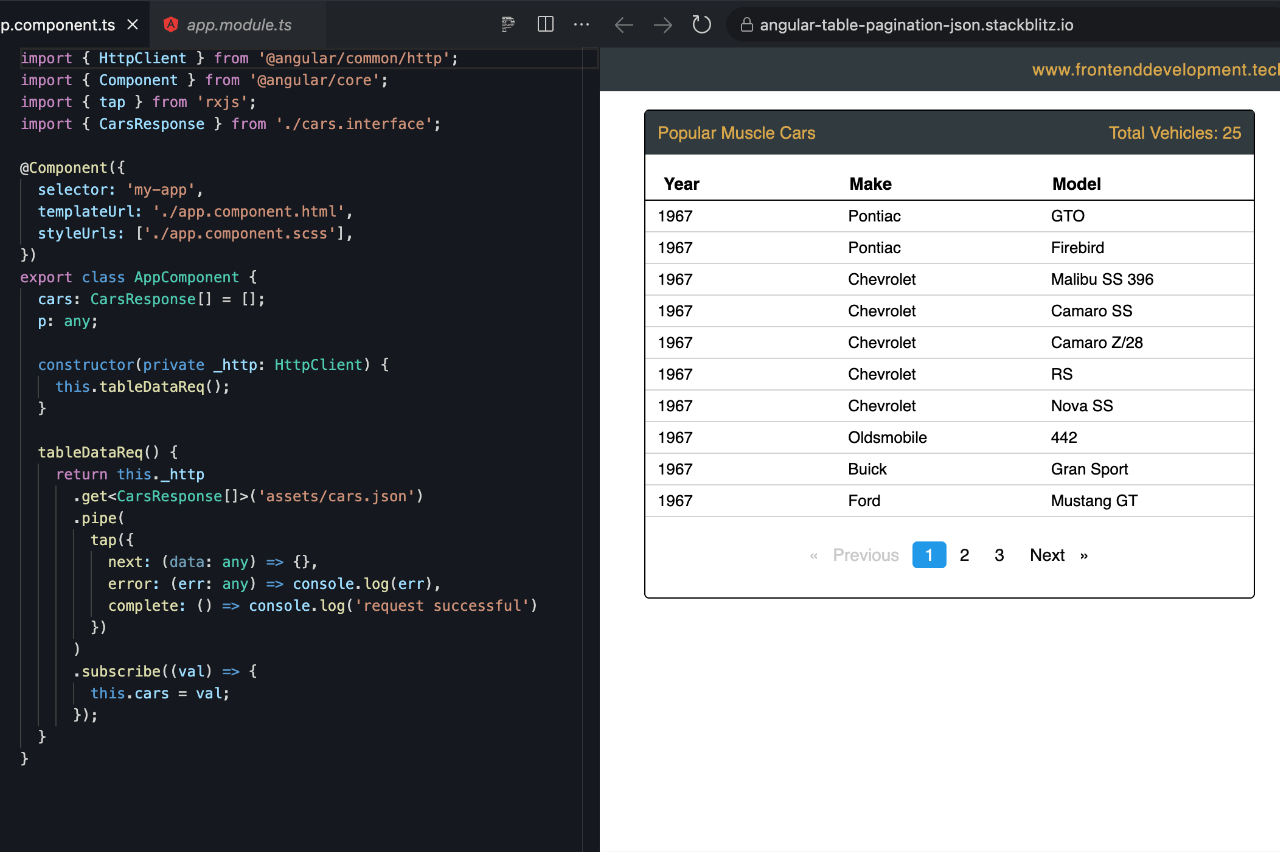
- p is indicative of the current paginated page.
- Reference the httpClient in the constructor then request the data.
- tableDataReq() fetches the response with the usual observable suspects of next, error, and complete.
- Subscribe to retrieve the request and set it to the cars array.
- The pipe method is used to contain sequentially executed methods.
- tap() passes values to the observer, but also has the ability to perform independent operations. Suppose you want to push modified values to an array. We could display those modified values as well as the original values. For this reason, it’s often used for logging purposes. But, we all know, there are unique situations when we’d need to perform atypical tasks.
export class AppComponent {
  private unsubscribe$ = new Subject<void>();
  cars: CarsResponse[] = [];
  p: any;

  constructor(private _http: HttpClient) {
    this.tableDataReq();
  }

  tableDataReq() {
    return this._http
      .get<CarsResponse[]>('json-path')
      .pipe(
        tap({
          next: (data: any) => {},
          error: (err: any) => console.log(err),
          complete: () => console.log('request successful')
        }),
        takeUntil(this.unsubscribe$)
      )
      .subscribe((val) => {
        this.cars = val;
      });
  }
}
Again, some of the extraneous code may look foreign to you. Focus on the TypeScript as it’s the most important part. Developers need to know TypeScript and even JavaScript to excel in UI frameworks.
That’s it for the TypeScript!
Next is the markup. Loop over the cars array populating year, make, and model. Set the number of items per page followed by the current page. Please note however, using let i = index in the index loop does not successfully track the index. Indices are reset on every page. To circumvent this, you could add the index to the JSON or extrapolate the indice from the backend. Perhaps a more succinct method would be to use the aforementioned “i” variable, then simply multiple it by the current page.
<div id="table-component">
  <div class="table-details">
    <span>Popular Muscle Cars</span>
    <span>Total Vehicles: {{ cars.length }}</span>
  </div>
  <table>
    <thead>
      <tr>
        <th class="pl-15">Year</th>
        <th>Make</th>
        <th>Model</th>
      </tr>
    </thead>
    <tbody>
      <tr
        *ngFor="
          let car of cars | paginate: { itemsPerPage: 10, currentPage: p }
        "
      >
        <td class="pl-15">{{ car.year }}</td>
        <td>{{ car.make }}</td>
        <td>{{ car.model }}</td>
      </tr>
    </tbody>
  </table>
  <div class="pagination">
    <pagination-controls (pageChange)="p = $event"></pagination-controls>
  </div>
</div>
Beautify it with SCSS
Beyond the nesting, the only real anomalies here are the use of ::ng-deep. This unique selector is oftentimes frowned upon. Possibly because it’s used the wrong way in my opinion. I use it specifically to override third party library styles. These are classes that cannot be captured before rendering. The selector is used in the shadow DOM.
The drawback of using ::ng-deep is it disables this encapsulation process. In turn making the class global. Moreover, it has unexpected results with lazy loaded modules. Regardless, it seems to be virtually impossible to override third party library styles without it.
In Closing
Here’s another data table written in React. And, please see an itemized list of projects similar to this one. There’s an infinite of ways to accomplish pagination. I’ve used this method many times over though in a variety of projects. It’s always straightforward, flexible, and easy to customize. If you’re met with a challenge at any point, check out the Angular Data Table Stackblitz demo. Thanks for reading. Have a great day!
Leave a Reply